Memphis style BBQ brisket

My approach to making this is designed to be replicated easily by any home cook with a cheap a smoker. The technique is simple, time consuming, but simple.

Perfect BBQ Pulled Pork

Low and slow is the key to a mindblowing pulled pork recipe. I am talking temperatures of 200-230°F/93-110°C, for several hours.

Vegan Butternut Squash Soup

This tasty from scratch butternut squash soup recipe will keep you warm through the holidays

Beer can chicken

Grilled beer can chicken is deliciously moist! You can't taste the alcohol - it just keeps the chicken really juicy and tender.

Oat bran Muffins

I know what you're thinking.....bran muffins are only for old people! Think again. They are moist and delicious but not overly sweet. Perfect for breakfast!

Tuesday, 7 August 2012

Vegan Butternut Squash Soup

This tasty from scratch butternut squash soup recipe will keep you warm through the holidays!

STEP 1. Ingredients needed
  1. 5 lbs Butternut Squash - I bought a gigantic 5lb one, you may need to buy 2-3 smaller ones.
  2. 4 cups Vegetable Broth
  3. 4 cups Water
  4. 1 Onion
  5. 2 Potatoes
  6. Olive Oil (1/4 cup)
  7. Nutmeg
  8. Salt
  9. Pepper

STEP 2. Prepare the vegetables
Peel butternut squash and potatoes.  Chop into cubes (about 1" in size).

STEP 3. Boil the butternut squash
Put vegetable broth and water into large pot with cubed butternut squash and potatoes.  Put on medium heat.

Leave squash to cook and start working on onions.

STEP 4. Saute the onions
Add olive oil to a large skillet.  Heat up oil and add onions.  Saute onions for 8-10 minutes until onions are clear.

Take onions and put into pot with squash.

Cook the pot on low heat until squash is tender.

STEP 5. Blend soup
I have done this step using a stick blender, regular blender, food processor, and by hand.  All methods work it just depends how easy you want to make it on yourself.

The easiest is to use a stick blender.  Once the butternut squash is tender use stick blender to mix contents in pot.  This is the easiest because you don't have to transfer any ingredients in and out of the pot.

If you were to use any of the other methods.  Sift the squash and potatoes out of the pot put in blender, food processor, or mash with a spoon.  Then put contents back in pot and mix well.

Once contents are mixed keep on low heat for 20-30 minutes.  


Perfect BBQ Pulled Pork

Low and slow is the key to a mindblowing pulled pork recipe. I am talking temperatures of 200-230°F/93-110°C, for several hours.

TOOLS NEEDED

  1. A gas grill with at least two burners.
  2. Hardwood chips
  3. Smoker box
  4. Tongs/Spatula - You need a darn good heavy duty pair of tongs to handle a pork shoulder. A spatula (preferably a strong grill specific type) is perfect for getting that lovely chunk of meat off of the grill.
  5. Aluminum roasting pan (disposable, for ease of clean-up) It will keep the juices from causing flare-ups and will provide moisture to the roast.
  6. Oven/Grill thermometer - This is very important, as this tool is the only way you will really know what's going on inside the grill! To "pull" pork, the meat must reach the ideal temperature of 212°F/100°C.
  7. Chimney-type charcoal starter - For the charcoal grill people, this is the best way to start the coals.
Try not to get to overwhelmed. All of these are pretty standard tools BBQing. If you plan on doing more outdoor eating this summer, I guarantee that you will use them all again.

STEP 1. Prepare your meat
Pulled pork is made with the pork shoulder.

Prep your Meat:

  1. Trim the skin and excess fat (leave about a 1/4" layer) off the roast. Rinse the roast and pat dry with a paper towel.
  2. Spices! This recipe calls for a rub. Do you want a rub with simply a couple of spices, or a grand mixture of complimentary flavors? Wet or dry rub?
  3.  Apply the rub liberally all over the meat, working it in thoroughly. Cover with plastic wrap and refrigerate until an hour or so before cooking. It is best to allow the meat to come closer to room temperature before putting it on the grill.

STEP 2. Fire up the grill
  1. Fire-up the charcoal... For this recipe, you'll need to replenish the coals occasionally to maintain the ideal temp. Use your oven thermometer,placed near the meat,to keep track of the temperature.
    NOTE: Please, if you use a charcoal lighter fluid, let the coals to burn to a grey ash coating. NEVER use self starting charcoal. It can impart chemicals onto your food.
  2. Start with about 45-50 briquettes and let them get to a nice even white/gray color. Move the coals to one side of the grill and open the bottom and top vent all the way
  3. Put the smoker box over the coals. Close the grill and let the smoke get started being all smokey.   
STEP 3. Cook the life out of it....
  1. Place the roast in the pan,fat side up. Place it on the grill, cooler side of the grill. Keep the temperature at 210-225°F/99-107°C. Close the lid, with the vent opposite the roast (to pull the heat and smoke towards the meat).
  2.  With the tongs, check the meat for the first time in about an hour. Make sure the temperature is holding steady. For a charcoal grill, add hot(gray) coals. Add fresh coals (approx.8-12 per hour) as needed.
  3. Rotate the meat (quickly)about every 30-40 minutes, to cook evenly.
  4. Check the roast at the thickest part, not touching a bone. You want the thermometer to read 190°F/88°C. Pull it off of the grill and rest the meat for about 20-30 minutes. This allows the juices to move back to the center and let the roast finish cooking 'passively'.
STEP 4. Pull it apart
You can now "pull" the meat!  I just use a couple of forks in a shallow roast pan. Top with your favorite BBQ sauce. 


Memphis style BBQ brisket


This approach to making BBQ brisket is designed to be replicated easily by any home cook with a cheap charcoal smoker. The technique is simple, time consuming, but simple.And tastes really really good.

STEP 1. Pick a nice bit of brisket meat

The first step is the most important step and that is to choose a good bit of brisket.

The are a number of key things to look for in selecting brisket. inspect the fat cap and the fat line in the meat. If it is spongy or discolored, do not use it. A nice hard fat cap with dense fat is really important and will give you a lot better finished product at the end.


STEP 2. Getting your meat prepared (Brining)

The next step is to create a brine (1/2 cup sugar, 1/2 cup Kosher salt to each gallon of water), soak your brisket for 24 hours. Put the mix into a food-safe 5 gallon bucket and store in a clean and cool place.

STEP 3. Preparing the brisket (Marinade & Dry rub)

Take the brisket out of the brine after 24 hours and place it on towels to air dry. Then completely brush with Larouex's Memphis Styled BBQ Sauce (this will provide the stickiness) and coat with the BBQ Meat Rub Down.
 
Ingredients for the meat rub
  • 1/2 cup salt 
  • 1/4 cup pepper 
  • 1 Tbsp garlic powder 
  • 1 Tbsp oregano 
  • 1 Tbsp celery seed
  • 1 Tbsp paprika 
  • 1 Tbsp Chile powder 
Marinaded

 Rub
Wrap in foil


After you have wrapped them in foil, put them back in the bucket and let them marry flavors for another 48 hours. Store in a cool and clean place!
 
STEP 4. Preparing the wood chips and smoker


Once you have given the brisket a good 48 hours with the rub and let the flavors from the brine infuse with the meat, it is time to smoke! you can use any cheap smoker and it will work great. Or you can spend loads on a nice side-box smoker, but having fancy equipment is not required!
 
Build a nice base of heat and then add charcoaled Mesquite and Hickory. Soak the wood chips (I use a blend of hickory, apple and mesquite) and add them in every 1/2 hour to get lots of smoke.
 
STEP 5. Smoke the brisket!
 
The cooking and smoking step...
  1. Prepare the wood chips by soaking them for at least an 6 hours before using. 
  2. Build the charcoal base and get it really hot! 
  3. Use a smoker with a water bath.
  4. Keep the heat nice hot and use a nice full wood charcoal for the next 3 hours of smoking.
  5. Put the meat in with the fat cap facing upwards. Rotate halfway (1.5 hours) through the smoking.
  6. Keep lots of smoke going. Add soaked chips every 1/2 hour.  
STEP 6. Render the fat cap to make the brisket nice and tender
 
The final step is to take the brisket after smoking for 3 hours and wrap in foil, keeping the fat cap facing upwards, Then place them into a 450 degree oven with a water bath and cook for another 1.5 hours (make sure to not let the water evaporate!) and then allow to cool.
This technique renders the fat cap through the meat adding flavor and tenderizing the meat to perfection.
 
FINISHED....
while its still warm you can vacuum pack and it into the fridge. I will last a week in the fridge and if need it stored longer, just stick it in the freezer.


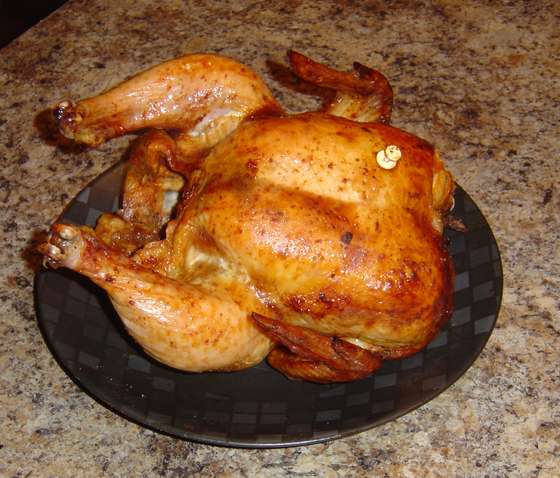
Beer can chicken

Grilled beer can chicken is deliciously moist! You can't taste the alcohol - it just keeps the chicken really juicy and tender.

STEP 1. Make your spice rub
Then gather the ingredients for your spice rub.
  1. 1/4 cup paprika
  2. 1 tbls brown sugar
  3. 1 tbls granulated sugar
  4. 2 tsp salt  
  5. 1 tsp onion salt 
  6. 1 tsp black pepper  
  7. 2 tsp cayenne pepper 
  8. 1 teaspoon garlic powder
  9. 1 teaspoon onion powder

Mix all ingredients together in a bowl.

STEP 2. Prepare the chicken
Clean out the cavity of the chicken to make sure the kidneys and giblets are removed.

Rinse the chicken in cold water, then pat with paper towels to dry.

And of course make sure that you thoroughly sanitize your hands and workspaces after handling the chicken.

STEP 3. Rub the spice mix onto the chicken
Sprinkle a tablespoon of spice into the cavity. Insert another tablespoon under the skin of the chicken and try and spread it out evenly. Finally, rub another tablespoon of spice all over the skin on both sides.

STEP 4. Get the beer can ready
You will need a tall can of beer to hold your chicken. Any brand will do, so if you have a 20 ounce can of beer on hand, feel free to use that. Otherwise, you can buy single cans of beer in the refrigerator section of most liquor stores. I chose fosters because their keg-style can is wider and sturdier than the slightly cheaper budweiser.

Pop open the tab on the can and empty out 1/4 of the beer. I'm not into beer so I poured it down the drain, but feel free to drink it if you like!

You want to make a few more small holes to let the vapors escape into the chicken. You can use the pointy end of a beer bottle/can opener for this. I did not have one handy, so I tapped an awl into the top a few times.

Pour the extra spice rub into the beer can.

STEP 5. Still the chicken on the can and plug the top
Keeping the can upright, place it into the cavity of the chicken.

Plug the top of the chicken so that the vapors are sealed in. used a peeled onion

STEP 6. Stick chicken in oven
Move the chicken to the oven and stand it up with the legs spread apart (this will help maintain balance). And cook a per its weight asks.

STEP 7. Its done!!!!!!!!
When your chicken is finished, the outside will be crispy, but the meat will be fall-off-the-bone tender. Carefully remove the chicken from the oven. Place the finished chicken on a plate and discard the beer and can.

STEP 8. Rest the chicken and carve
Let the chicken rest for 5 minutes before carving.  


Monday, 6 August 2012

Oat bran Muffins

I know what you're thinking.....bran muffins are only for old people! Think again. They are moist and delicious but not overly sweet. Perfect for breakfast!

Oat bran muffins
  • 1 c. milk
  • 1 1/2 c. oat bran
  • 1/3 c. olive oil
  • 1 egg
  • 1 t. vanilla
  • 1/3 c. brown sugar
  • 1/3 c. agave nectar
  • 1/2 c. whole wheat flour
  • 1/2 c. all-purpose flour
  • 1 t. baking powder
  • 1 t. baking soda
  • 1/2 t. salt
Preheat oven to 375 degrees F.

In a small mixing bowl combine milk and oat bran. Set aside to soak.

Meanwhile, in another small mixing bowl, combine oil, egg, vanilla, brown sugar, and agave nectar. Set aside.

In a large mixing bowl sift together flours, baking powder, baking soda and salt. Mix in wet ingredients and stir to combine. Add in oat bran mixture stirring to incorporate well.

Line a 12 whole muffin tin with liners and fill each evenly - approximately 3/4 full.

Bake for 18-22 minutes or until toothpick inserted come out clean.